Kick-Start Your T-Shirt Printing Business: Designs And Colour Pattern Guide
 Colorful t-shirts on colorful background. t-shirt mock ups with five different colours. 3D illustration
If you're looking to kick-start your t-shirt printing business, Gelato's print-on-demand platform offers a range of merchandise including designs, color, and pattern guides to help you create the perfect product for your customers.
You’ve settled on the business you want to start, and you know it’s a T-shirt printing business. Everything is set—funds and the equipment you need—and all that entails a T-shirt printing business. Almost everything, except that you haven’t decided on designs and colour patterns. In the T-shirt printing business, choosing colour patterns can be quite tricky. Not because you don’t know about colours, but mainly because you want to create your unique style.
But that doesn’t have to be the case. If you already have a background in the design business, you must have a feel for design, patterns, and colours. There’s something that excites you about making creative patterns and shades on blank canvases such as shirts. Even if you don’t think you’re quite there yet, this guide will help you make your designs stand out.

The Design Guide
The first step in designing a T-shirt is figuring out the goal of your creation. This will guide you decide on which designs are the most sellable. The design process has been simplified by the rise of reputable one-stop sites such as Tee Junction where you can easily customise your designs and see how they look on an actual shirt. Also, you can hire designers to help turn your concept from an idea to a sellable design. However, this may cost you extra, depending on the services you’ll need from them.
If you don’t have a goal yet, start by writing down what you want your design to portray. If you’re going to get the most out of a design, don’t rely too much on your personal preferences and get measurable market data. Notably, T-shirt designs, like any most fashion, moves with current trends. That’s why getting real data is important.
To help guide you actualise your T-shirt designs, here are some common themes from which to choose:
- Custom designs
If there’s one fashion trend that’s taken the world by storm, it’s the customised fashion industry. You give customers the chance to get exactly what they want. It also guarantees uniqueness since everybody has a unique style. The age of internet shopping opened a door for fashion lovers to use reputable online sites to order customised T-shirts at affordable prices. People can use them for personal fashion or businesses can use customised designs to promote their brand.
- Inspired By Nature
Nature-inspired designs never get old. They symbolise the beauty of our surroundings and imparts a sense of serenity, growth, and renewal to most people. It can be anything from wild animals, landscapes, flowers, or butterflies. The good thing about these designs is they’re for all seasons and can attract a broad customer base.
- Statement/Typography Shirts
These text-centric designs are a great way of conveying a message. Your theme could be inspirational quotes, bits of humour or wisdom, advocacies, or company mantras. By using different colours and visual effects, you can enhance the design to fit a particular market. This is suitable for fashion retail as well as company promotional branding.
- Playful Designs
They are creative, imaginative designs made to influence positivity and happiness. They can come in comic characters, vibrant colour mash-ups, and dazzling patterns. They are made to make people take a second look. They’re meant to influence a positive mood and can be used for fashion.
- Themed Designs
People use themed designs for various purposes. However, they are best used to promote events and conferences, parties, and celebrations. They can also be created around a specific niche such as sports, music, photography, etc. You can collaborate with event organisers to make T-shirts for their event or with organisations that need themed shirts.
The T-shirt design ideas are endless; and your creativity, audience, and current trends are great pointers when starting your T-shirt printing business.
The Colour Pattern Guide
The way you blend colours in your designs can influence the way people see your designs. There are basic techniques for colour combination based on the colour wheel. They can help create distinctive colour patterns that can make your designs turn out great each time. This is a breakdown of colours and how you can use them to make eye-catching T-shirt designs:
- Monochromatic Colours
These are colours of the same family with varied hues, brightness, and saturation. Saturation is made by adding darker shades to the hue, while you make them brighter by adding white. This colour technique is suitable for a design for low-key customers who are only wearing the T-shirt because it looks good and not for promotional purposes.
The good thing about this is that it can be simple to make since you are only playing around with the same base colour. Monochromatic designs are clean and simple and are an excellent choice when you aren’t too sure about the colour patterns you want to use.
- Analogous Colours
They are colours next to each other or colours in the same quarter of the colour wheel. They have a similar look, and the slight differences in the shades can create great colour patterns. If monochrome looks too flat for you and you still want to give your design some more life, then try analogous colours. To make the design stand out, don’t use even colours. Instead, use one dominant colour and then accentuate with the other two.
- Complementary Colours
These are colours found opposite each other on the colour wheel. They make a great design when you want to attract attention to your T-shirt. It makes a good design for organisations or clubs that have a message they want to be noticed.
- Triadic Colours
In this colour scheme, you create a design using three colours at equal distances apart from the colour wheel. The contrast isn’t as pronounced compared to complementary colours, but it offers a good contrast level, creating excellent harmony. It works best when you want to create a fun design such as a celebratory and party T-shirts.
Conclusion
Designing is an art. When starting a T-shirt printing business, put your creative foot forward and have fun with it. Don’t be afraid to break the colour rules a little and create something unique. This guide is just a guide on the basic rules that can help you start your T-shirt printing business on the right note, if followed.
Victor Sanders
Victor Sanders is a custom merchandise printing specialist. He designs and print branded merchandise for all types of purposes and customers. He shares his expertise online through guest blogging.
5 Common Color Palettes Used While Designing a Games Cover Picture

Do you know that your choice of colours in creating a colour palette indicates the success of the message you are trying to communicate? Colours can appeal to the eyes and brain of your visitor so that they want to keep reading what you have to say.
Additionally, colours can revolt and repel the reader and cause them not to want to continue with the message you are trying to pass.
Therefore, the term colour palette is used in design industries to refer to a pre-arranged set of colours set on an agreed set of rules to be aesthetic and appealing to the user.
Here, come with us and show you how to choose the best colour palette for your game picture.
Choosing a Palette colour to Design Games cover Picture
Choosing a palette colour for your game cover picture can be massive and challenging. It has to make the blueprint or product turn into something convenient for the user. Furthermore, it also has to make the viewer want to peruse what is inside.
Here are some of the most common colour palettes for your games cover picture.
1. Nature colour combination
Naturally, nature is beautiful, and its colour combinations are natural, beautiful and appealing.
The beautiful thing about a natural colour palette is that it is alive, and it keeps changing with the beautifully varied scenes the environment presents. You can see through the raindrops, a hillside, a serene sunrise or distant sunset. You can have a forest, a sunny desert day or a beach as the environment presents.
Each of these scenes has colours naturally arranged to bring about an appealing whole. All you have to do is borrow from nature, for your game picture cover is the best.
You will have the most beautiful arrangement for your palette selection from nature if you follow the design pattern for a game called Play with Pro in Warzone & Apex Legends.
2. Monochromatic
Monochromatic design is easy to create because it doesn’t have many colours from which to choose. It is easy to use and lets the colours shine through.
Unfortunately, if not carefully organized, it will create something ugly and dull. When done professionally, Monochromatic gets the colours to speak.
Although if it is well done, chromatics is an excellent choice of palette for your games cover as it lets the colours speak to your visitor, so they want to listen
3. Analogous Palettes
By contrast, analogous uses colours from both sides of the colour wheel with the primary colour in between. They express a feeling of cohesion and constancy in an outline. Therefore, your Games cover will stand out.
The hues are closely related and easy to work with because there isn’t much contrast. The distinction between them is communicated through colour shades to bring about one compatible whole.
Analogous colours can be very appealing and are easy to work with to bring harmony to your games cover picture and make your product unique.
4. Complementary Palettes
Likewise, the complementary palette uses opposite colours on the colour wheel like blue and Orange. Professionally used, complementary colours bring about a sense of balance. It is an excellent choice for your game cover picture.
At the same time, opposites or complementary colours can be very appealing, especially when tints and shades are added to expound on the theme to make your cover picture unique.
Just make sure you don’t place them next to each other because they will cause eyestrain by their loud contrast!
5. Triadic Palettes
Uniquely, triadic uses three colours from an equitant distance on the colour wheel: blue, yellow, and green. These colours make for a diversified palette with the broadest range of shades and hues. It will make your cover picture appealing.
However, a Triadic palette is not recommended for amateurs but for this designer who wants to experiment with colours and is ready to take time on it and bring out something special.
The 60%+30%+10% Proportion Rule for Palettes.
While using colour palettes, it is paramount to use the interior designer’s rule of 60%+30%+10%. This arrangement allows the colours to balance.
As a whole, this formula is meant to soothe the vision as it agreeably moves softly from one point to the next. It is also effortless to follow. 60% is your dominant colour and allows it to stand out.
30 % is the secondary colour designed to take half of the same space occupied by the primary colour. 10% is the accent colour. It’s designed to provide support for both the dominant and the secondary colour.
Taking care of Special Needs Sight visitors
8% of men and 0.5% of people with Northern Europe Ancestry are colour vision deficient or wholly colour blind. Therefore, designers have to employ colour-friendly pallets designed to accommodate this class of people, otherwise known as CVD.
So, they have to use inclusive product design. Since you have to build a product for everyone, you can do this by increasing colour contrasts to become louder and more visible.
Parting shot
In short, a unique colour palette for your game picture is meant to make your product more appealing, more accessible to all site visitors. Your colour palette says a lot about whether your site visitors will come back.
Using the natural colour palette as the colours are already arranged aesthetically. Natural colour selection palette is your best shot at having a well-balanced picture and, at the same time, appealing.
You can also use professional colour palettes. You can do them yourself, or you can use colour apps to pinpoint a palette of your choice.
Furthermore, colour apps like Color Hunt, Paletton, Colosco and Adobe Kulur can help you create quickly or choose a palette for your design. You can also use colour blending like Color Scheme, Designer or Color Blender to blend colours into hues, shades and tints that compliment your design.
How to Use a Laser Cutting Machine for Jewelry Making

Back Story
Jewelry making as a decorative art has been around for thousands of years, and it continues to influence today's fashion world. With CO2 laser engraving and cutting becoming more popular in recent years, many DIY crafters and small businesses have adopted this practice for jewelry making. Back in the day, it used to take quite a lot of time, effort, and resources to create a timeless piece of jewelry. But CO2 laser cutters have shortened the production time — you just have to put time and effort into creating great designs in various software programs. Acquiring a laser cutting machine can turn your jewelry hobby into a small business. Plus, these machines are capable of engraving various materials of different shapes and sizes.
Another advantage of using a laser cutting machine for jewelry making is greater precision and versatility. These machines allow jewelry designers to produce complex shapes that were previously impossible to achieve by conventional cutting methods. The best part? Learning how to make laser-cut jewelry at home is a lot easier than you might think! Today, I'll give you a step-by-step approach and guidelines to follow while making jewelry with a laser cutting machine.
Steps to Take
Design with the right software:
Laser cutting software is crucial to your machine, as it translates your vector files into the control board. Vector files are computer graphics essential for laser cutting that unlock endless design personalization. It is highly customizable with vast options of lines, curves, polygons, and sizes. Learning how to take advantage of all the design functions will allow your creativity to shine. It is also very important to learn how to convert them to the correct file. Laser cutters from companies like OMTech use common files such as .jpeg, .png, .bmp .ai, .eps, .dxf and other vector file types.
Scale your design:
Once your design is in the correct format, the next step is to scale it correctly for your laser cutting machine. This implies that you must make sure the unit of measurement used in the design is the exact same one you want to be cut. Failure to do this might result in the wrong scale or proportion of the artwork to the material, which will lead to waste of material and laser tube life.
Connect your design:
Bridging your design is as important as the design itself as it will determine the outcome of your cut. As a designer, the "bridge" function will help you keep your design in one piece. Shapes could be lost if you do not keep them attached to the base component of the design. By using the bridge function, the laser will cut more neatly, and the design will come out better without missing any detail.
Convert your text into shapes:
Another mistake you should avoid is failing to convert a text design into a shape. Laser cutters cannot process active text boxes. Converting these into shapes will allow the laser cutter to process them properly.
Ensure your cutouts are large enough:
Another note to take while laser cutting — always match the thickness of your design to the thickness of the material. Any inconsistencies will result in failed designs and a waste of material.
Get rid of all intersecting lines and open shapes:
If your design is complex and has any kind of an overlap, you will need to remove those overlapping lines. This will prevent the laser cutter from cutting any unnecessary lines into your design. Also, ensure that all designs are complete, as open and unfinished shapes will not be successfully cut.
Reduce the complexity of your design:
To prevent overlapping lines, as stated earlier, try as much as you can to reduce the complexity of your design. Simplistic and convenient designs will require less testing and minimize the costs for you and your machine.
Choose the right material:
It is crucial to choose the right material that will best fit your design. From observation, most jewelry is made with glass, acrylic, and wood. These materials are compatible with a CO2 laser cutter. The next step is choosing the right settings for your material. But bear in mind that laser settings are not definite or rigid; you would only find the best setting for your material by trial and error. OMTech provides their suggested settings on various materials through their website.
Adding color to your jewelry:
You can further customize your jewelry by adding color to your designs. Acrylic-plexiglass sheets are available in a wide range of colors — pair different shades together to bring colorful configurations to your artistic arrangements. If you're focused on engraved glass ornaments and jewelry, enamel paints offer smooth application, rapid drying, and long-lasting performance on glass surfaces.
Wood is also becoming more popular in the custom jewelry world. It can be colored with acrylic paints to create almost any design you can imagine. Another benefit of wood jewelry is that it can be enhanced with certain stains and finishes to display the organic wood grain, and you can change the look by painting or staining before or after the laser engraving/cutting process. There are many different shades of wood-color stains available as well as various finishes like matte, satin, or gloss. Just make sure to find jewelry-specific materials because some stains and varnishes have a strong smell.
Conclusion
Knowing how to use a laser cutting machine for jewelry is not as complicated as you might think; it simply requires you to pay attention to the small details. Through a bit of time and patience, you can cut your jewelry ideas into reality. If you are a hobbyist or a small business owner, OMTech has been a one-stop-shop for the laser engraving community. They offer the best value for your money with outstanding after-sales service and other resources. Their product line is diverse, so there is something for everybody depending on your budget and goals.
Check them out today and begin your laser engraving journey!
How To Get The Best Colors For Your Living Room Décor in 2021
Every beautiful work of art and nature is a function of color. Colors help to define designs and decorations. It is almost impossible to project the most exemplary art and décor without suitable colors.
But as much as colors are essential, deciding the best color for your living room décor can be somewhat challenging. The living room is an integral part of your home. It is where you get to receive visitors. So, you must give it the best color flow and overall design.
Are you out of ideas for the best colors to use in your living room? Check out some of the effective ways to develop color ideas for your living room.

- Let It Flow
The first thing that should come to your mind while deciding on colors is the flow. This consideration is quite essential if you are using two or more colors, and the color flow is critical for projecting your design ideas. The color must flow with each other and with the home's existing design.
- Draw Inspirations
The best works of art and designs are from deep inspirations. You can also draw inspiration from various sources. You can find some ideas here to help you draw creative inspirations. Check out existing color designs that can help you to create yours.
- Use Suitable Undertones
Undertones of your color can provide you with a suitable and much-needed hue. It helps to improve the general appearance of the paint. An undertone can be neutral, warm, or cool. So, the type of undertone you use can determine the warmness or calmness of your color.
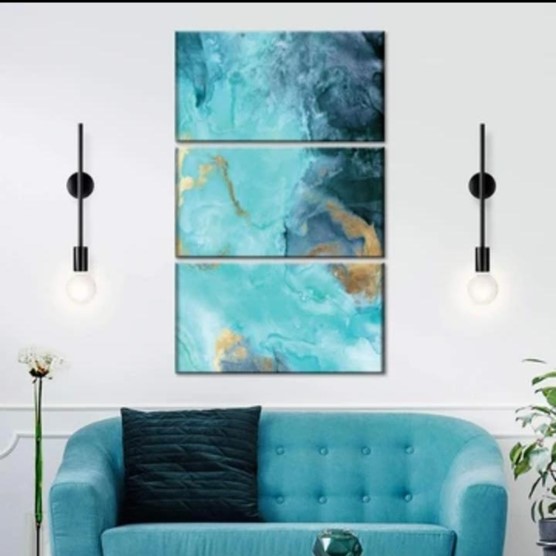
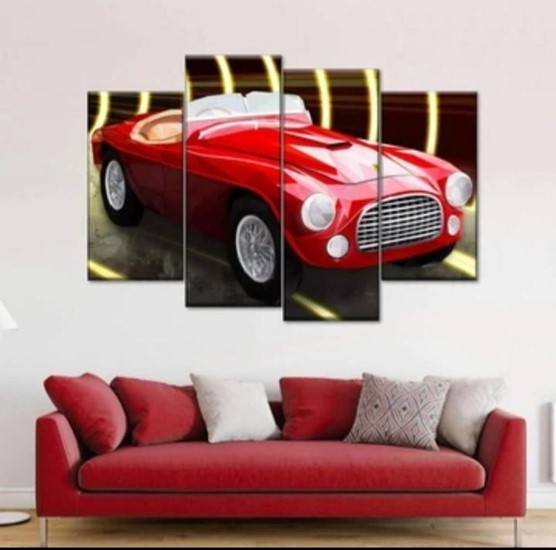
- Use inspiration from wall prints.
Wall prints are an essential part of traditional home design. They add quality, depth, and elegance to your home design. If you are out of color ideas, you can draw inspiration from your wall prints. Artistic wall prints often use creative color combinations. You can choose the color that flows well with your prints.
- Use your favorite color.
There is nothing wrong with using your favorite color for home décor. All you need to do is ensure that you go creative with the application of the colors. You can even use your children's favorite colors as long as you have the right design to blend with the color flow.
- Use the color theory.
If you tried any of the methods above and it appears it is not working, you can apply the color theory. Color theory will help you understand the concept of colors. It will aid your understanding of which color best suits your living room and why it is suitable.
You can use various online tools to generate suitable color schemes. This option helps you come up with multiple ideas, and you can select the best option for you.
Summary
Color is an essential part of home décor. You might not achieve your dream living room if you don't use the right color combinations to project your ideas. The tips above will help you find and identify the most suitable colors for your living room.
Don't forget that your living room is the first point of contact for visitors with your living room. Ensure to give it the best color flow!
8 Ways to Add Accents or Highlight Colours to a Room

So, where can you work in accents or colour highlights to a room? Think it's hard? It couldn't be further from the truth. Here are 8 ways I can show you how.
Skirting and Trim
Trim is far too often overlooked when it comes to decoration, with many people simply leaving them unpainted or opting for an unassuming colour. However, when carefully painted, skirting is a fantastic way to accentuate a feature wall or contrast the brightness (or darkness) of a wall.
Be careful to choose a milder colour, though! Anything too vibrant or dark is likely to be swallowed or overwhelmed by the floor and the walls themselves.
Furniture
It's important to think about how your furniture contributes to the colour scheme of a chosen room. It may be tempting to keep your furniture to a singular colour, or to opt for the dominant shade in the room, but using an accent colour can create a real visual statement. Try using a particular piece of furniture, like an armchair, to break the flow of colour in your room.
Rugs
Rugs have been used for centuries to add a bit of colour to dull environments, so why not use them to contrast or highlight the colours in your rooms? Take a little care when choosing the colour of your rug, though. You want to make sure that it is adding to your room's overall design and not overwhelming any of the other elements.
Pillows and Blankets
Perfect for adding pop colours, pillows and blankets can be used to draw the eye and interrupt the solid, uniform colours of some furniture. Some brightly colour cushions or a throw on a dark sofa can make all the difference.
Radiators
Another feature that many people seem to paint white and forget about. Radiators can also be used to contribute towards the look of a room, rather than simply being hidden from view. Stylish or cast metal radiators like those found here can also act as an accent without the need for any paint.
Window Frames
It's not uncommon to see window frames used as a highlight or accent on the outside of buildings. Still, it is less common inside, where many people simply paint them the same colour as their walls. Window frames are a great opportunity to add a little bit of brightness or white, to a darker room, with bright colours also intensifying any light coming through the window.
Plants
Nature's highlights!
Good placement of plants and flowers can really help make a room feel alive and bring a little more natural colour. They are well suited to both breaking up an intense colour scheme or adding a bit of pop to a minimalist design.
If you don't exactly have a green thumb, there are also loads of great quality fake plants out there. With a little bit of clever placement, no one will be able to tell the difference.
Accent Walls
Last but certainly not least, choosing an accent wall is a tried and tested way to improve the visual appearance of a room and solidify a style. In principle, accent walls encourage the use of milder design elements on all other walls and choosing a single wall to make the feature of your room.
There are lots of different options to choose from when it comes to creating an accent wall, from making use of texture, striking colours, furniture and decorations. Wallpaper has even made a return in that field, with a huge range of designs that can easily be applied to the wall.
Now get to decorating!
I hope you found these tips to offer a little inspiration for your walls. As always, you can get expert advice in our interior looks section.
10 Best Color Schemes For Your Bedroom In 2021
The year behind us, 2020, started a new trend when it comes to interior design. While spending so much time indoors during the lockdown, we began to redecorate our homes to become the perfect balance of a place to relax and a place to be productive in.
However, one particular trend has ruled the designs of our bedrooms. These spaces have become more floral and green as if we wanted to bring more life to this area of our lives. These colour schemes created by our COLOURlovers are designed to open our minds and make our evenings calm and peaceful.
If you are thinking of redesigning your bedroom, check out this website for more inspiring ideas from interior design experts.
Rose Gold Clouds
Cloudy Sclera fits amazingly with Grumpy pink in this palette. Both colours have a calming effect, which is elevated by the addition of the cheerful light orange. Teal Appeal brings the colours of nature, which is an excellent addition to this gentle set of colours.

Misty Mood
Misty Mood is a palette designed for a chill rainy day you want to spend in bed binging new Netflix series. It includes the best misty colours: Mint, Rose, Moss, and Misty Morn.

Artcaffe Pantone
Cabot Forest APC, Fear Before The Fire, and Good Fortune are the perfect palettes for young and bold Millennials ready to seize life.

Romantic deluxe
This palette is for an evergreen romantic environment that is popular among young couples. The palette is dominated by the Dormant colour, while the other shades support the flowery palette.

Winter Flower Hunt
Sometimes what we need for the beginning of a new day are cold colours. They remind us of a fresh start and the blank canvas we should paint during the awake hours.

Gentle Waves
These shades of blue and green are the most calming ones according to colour psychology. They are much needed in our bedroom when we spend the day in a stressful environment.

Peach Blossoms
This palette is one of the top-favourite palettes ever among COLOURlovers. It is a perfect combination of spring shades and the vibrant colour that breaks the melancholy.

Papua New Guinea
Another bold palette for an intimate environment. This is an exotic, energized, action-ready set of colours that motivate you to give your best.

Machu Picchu
Machu Picchu palette describes wilderness and a rain forest. The dominant colour is Ivy League, the colour of nature and resort.

You will be free
This liberating light palette is the way to go whenever you are not ready for bold changes. These neutral colours are associating you with freedom, and a fresh start day by day.

Which palette would you love in your bedroom?
Tell us in the comment section below.
Powerful Ways to Grow Your Graphic Design Business on YouTube

YouTube has transformed the way we promote brands, businesses, or products via video content by allowing everyone to create their own channel. Whether you are a freelancer, a larger organization or a startup, you can create a YouTube channel to upload and promote video content to reach the target audience.
According to numbers, YouTube is the second largest search engine after Google that people use to find useful stuff, solutions to their problems, and to learn more about their favorite brands. With almost 1 billion people watching videos on this popular video sharing platform, there is a golden chance for you to promote your creative graphic designing skills and expertise in front of a broader audience.
Whether you are a beginner colour lover or managing an established graphic design business, below I have listed some powerful ways you can take on right now to grow your graphic design work on YouTube.
Ensure your YouTube basics are satisfactory
Before doing anything else, you should take a deeper look at the fundamentals of the YouTube channels to make sure all the important boxes are ticked. Basic YouTube housekeeping starts with a consistent visual ID. Create an awesome channel icon, and YouTube banner (channel art) that show about your graphic design business a lot. If you are a brand or business, the use of a professional logo is highly recommended to be consistent in business branding. Fill the ‘About’ section of your channel with the most relevant and powerful words so potential customers or partners can easily find and get in touch. Make sure to add your social media profile links on the channel to help visitors find you across different digital channels.
Get views from YouTube’s organic search results
Just like other search engines around the globe, YouTube also has its own algorithms. They use it to provide users with the most relevant and useful videos in search results. There are many things you can do to get more organic views on your videos by appearing in search results. You can start with using descriptive and keyword-rich video titles. Also, use lengthy and keyword-rich product descriptions and tags along with creating enticing video thumbnails. You can also buy real YouTube views if you are not sure how to get YouTube SEO right. There are several YouTube growth services that you can avail for this purpose.
Ask viewers to subscribe
Getting more people to subscribe to your YouTube channel is one of the best and powerful ways to grow your designing related channel. You can encourage your audience to subscribe by adding a call to action in your videos. As numbers are always lower at the start, you can buy YouTube subscribers from a reliable company to make your channel look popular and inspire viewers to subscribe. It helps you get all your videos in front of the subscribers as soon as released. The more subscribers you will have, the more you will get views on your graphic design related videos.
Make your designing YouTube channel discoverable
Right after getting the basics right and have some awesome videos ready to move forward, make sure people can find your channel easily. Along with using keyword-rich titles and descriptions, adding channel keywords is a great way to make your channel discoverable. You can add channel keywords by clicking creator studio> channel> advanced> channel keywords. You will find a text box to add keywords that are relevant to your channel. So make sure to choose the most relevant and trending keywords (in your industry) to make it easily discoverable in YouTube search. You can also buy views on your videos to make them popular and appear in top search results. Hence, you should spend your money on the best site to buy YouTube views if you really want to reap the benefits of paid YouTube growth services.
Collaborate with popular colour lovers (graphic designers) on YT
In this modern landscape, collaboration is the hottest trend on YouTube. It is one of the best ways to grow your designing channel as it gives you more exposure and present your content in front of a totally new and relevant audience. When you work with a popular YouTuber in your niche or industry, your content is likely to be presented in front of their subscribers that can incredibly help you grow your presence on YouTube. Just find out some popular colour lovers (graphic designers) on YouTube and reach them out with an alluring collaboration offer. Most of them are ready to work for free (or for the sake of cross-promotion). In this way, you can easily get your graphic design business in front of more eyeballs even without spending marketing bucks.
Share your YouTube videos on social media
The beauty of video content is that you can easily share it across different social media sites to get more eyeballs on your videos. Sharing YouTube videos on your social media profiles is one of the powerful ways to grow your YouTube channel. Social media sites like Facebook, Instagram, and Pinterest can amazingly help you grow your audience. For this purpose, you can create a short video and link it to your channel to drive more traffic towards your channel. As attention spans are shorter these days, try to hook your audience in the first few seconds on your videos to encourage them to see the full video.
Introducing: The ultimate market for 3D models

No matter which industry you are in, these days it is hard to imagine presenting a project without using 3D models to paint a picture. Storytelling in three dimensions became a necessity in gaming, architecture, interior design, engineering, and marketing overall. Whether you are in need of an authentic 3D model to complete your sales presentation, or a 3D designer looking for buyers, 3dbaza.com is the right marketplace for you.
Purchasing original 3D designs
Finding 3D designs for all purposes
Everything you can possibly imagine - furniture, accessories, life-like plants and trees for exterior design, weapons, choppers, vintage cars and violins - brilliant designers worldwide have created and exported for you. Models are sorted under categories, making it easy for you to find exactly what you want: popular children’s characters, sports equipment for designing a gym, and so much more. No matter what you are pitching - a military strategy or a recreational centre, with real-life experience you will knock the audience of their seats.
Cashback rate of buying with 3Dbaza.com
This platform is extremely buyer-friendly, and it has a way of rewarding loyal customers. Aside from helping individual designers when purchasing their work, the more you spend on 3Dbaza the more you get in return. The percent of the money returned to you as cashback (coins you can spend on new designs) gets higher as your spendings accumulate.
Artists on 3Dbaza
Selling your unique 3D models
If you are the creative colour lover who experiments and creates astonishing designs in three dimensions, this platform offers you the opportunity to place your models for sale. You can set the price of your model within the rules of fair competition, or your listing will be assigned with the price tag according to its complexity and exclusivity. Moreover, you will join a community of designers such as yourself, that is an inexhaustible source of inspiration and fresh ideas. Most used formats are supported for upload, so there will be no hassle in converting your work.
Finding your customers
Unlike many platforms online where you can share and list your designs waiting for someone to find and hopefully buy them, 3dbaza is an established marketplace attracting the buyers who are looking for work such as yours. So, instead of doing commercialized work for one-time clients via freelance platforms, you can follow your passion and create models that come from your heart. Share your special, one of a kind piece with the world, and turn your hobby into your dream job.
Kitchen Organization Tips to Declutter Messy Kitchen

"Everything in its place and a spot for everything" is not only a truism Grandma cross-stitched on a pillow. It is likewise the best of the kitchen organization tips you can apply. However, for the vast majority, an organized kitchen is a fantasy to be accomplished some time or another after retirement when the children have moved out, and life is less hectic.
In any case, it is imaginable to keep the heart of your home away from mess without going through weeks on exhausting cleaning projects. The time has come to quit stalling, speak the truth about what you truly need, and recover the space you use to prepare dinners and appreciate time with loved ones.
How Clutter Affects Us
If the kitchen is probably the most chaotic room in your home, that messiness could be making you nibble more.
A study distributed in the journal Environment and Behavior found that people in cluttered, chaotic kitchens devoured twice the same number of calories as those in slick, clean kitchens. While the clutter is incomplete to a fault, attitude likewise assumes a job. Individuals who feel confused and crazy – which a muddled climate can compound – tend to eat more food, particularly junk food, than those who feel in control.
A study distributed in the journal Comprehensive Psychiatry found that individuals with high greedy practices – in other words, individuals who like to shop or get things for nothing – experience lower personal satisfaction and lower work functioning than those who don't exhibit such practices. As you would envision, individuals who show these practices have more messed homes than the individuals who do not.
Here are our top kitchen organization tips to get rid of the messy kitchen:
- Think Like a Minimalist
Your initial move toward kitchen freedom is to give the entire space a goal evaluation. Disregard any wistfulness connected to the things you have kept every one of these years and provide a simple idea of what you use consistently. Follow minimalists, individuals who do their best not to secure more than they need and to dispose of anything without an unmistakable reason
- Make Space for Paper
In the study’s test kitchen, a heap of mail sat on the counter. Since kitchens regularly go about as landing cushions, garbage mail, and other paper mess can be significant issues. Start arranging your mail and throwing lists, promotions, and other garbage straight into your recycle bin. Purchase an attractive letter plate without a cover to sit on the counter to hold bills, letters, and different papers.
- Emphasize ease of use.
Each kitchen has many crucial things used to get ready and eat meals consistently. Put the things you use most in simple to-arrive at spots to shield from removing everything from the best approach to get to that one bowl you need. Recall the old guideline: "Like goes with like," an essential way of thinking regarding storage solutions.
Make it as simple as possible to locate your number one thing by putting away dishes in a single place and cups in another and assembling similar preparation tools. This not just accelerates meal prep and table setting yet, besides, streamlines out the presence of your kitchen.
- Get Rid of Extra Gadgets
Experience your kitchen and give, part with, or sell little apparatuses and different things you do not utilize. If you can't choose whether or not to leave behind that quesadilla producer you got for your wedding, do the "cardboard box test," suggests Peter Walsh.
Reserve the bad things in a container. Each time you utilize one, returned it to your kitchen. If you have not used an item toward the finish of the trial, perhaps a few months, it ought to go.
- Focus on One Area at a Time
It is easy to begin randomly opening cabinets and cabinets stuff, yet this will rapidly make much more disorder and mess. A particular procedure is to start with one cupboard or one drawer. Experience everything in there and choose whether it should remain or go. If it will stay in the kitchen, is this the best spot for it? Prop up until you have prepared each and everything in that cabinet or drawer.
Once more, attempt to fight the temptation to "brush" your way through the kitchen, cleaning up random. It is easy to debilitate if you do this.
- De-Clutter Drawer Space
As you are reworking the things you utilize most to keep the kitchen organized, you will stumble into the mess in drawers, including the omnipresent " junk cabinet." Take the occasion to get out the wrecks you find as a feature of your general cleaning strategy.
If you must jump out to the store to grab some economic cabinet coordinators, do it. These simple plastic or wooden inserts can transform even the messiest cabinet into a slick and clean space. Get one for silverware and another for ordinary things, for example, tape, twist ties, and rubber bands. A few utensils occupy an excessive amount of room when put away in drawers. For example, enormous things, like spoons and potato mashers, are better kept on a mounted wall rack or simple pull holders adhered to the side of a cabinet.
- Store Items Based on Frequency of Use.
Put small appliances you utilize every day, like your espresso maker, on the counter. Machines you use once per week or month, like your food processor, ought to go on a lower rack or in a cabinet. Also, the stuff you utilize once every year similar to your turkey roaster? "Store it in a cellar or steel garage or someplace far away," McCann said.
- Power up your Shelving
Since you have figured out most of the staggering volume of stuff in the kitchen, you must have a smart thought of what you will keep. It is an ideal opportunity to direct your concentration toward the racks and perceive how best to sort out this space in your kitchen.
Tips To Decorate A Bedroom With Unique Themes

Having a well-decorated bedroom is always pleasant. You'll be waking up to a fantastic view every morning. Seeing your well-decorated room will instantly boost your mood, especially if the design is to your personal preference. It's ideal if you get to decorate it yourself, and can add a distinctive touch. While hiring an interior designer is an option, it can be costly and might not capture your vision for the room.
Having to decorate your bedroom can be a challenge, most especially if you want it to look like no other. You don't want a normal, classically designed bedroom; you want something unique.
If you're looking to decorate with some degree of originality, you might find it challenging to gather inspiration and materials. Listed below are some tips on how you can successfully decorate a bedroom with a personal, unique theme.

- Don't Be Afraid to Go Crazy
If you're coming from a traditional bedroom design and just starting to transform your bedroom into something unique, don't be afraid to go crazy. That'll help the design to stand out, as it’s not like anything else people have seen before.
You must make sure that you're comfortable with the idea of adding unique elements to your bedroom, and that they’re things which you’ll enjoy waking up to.
- Be consistent
Having a unique theme requires dedication and commitment, as everything must blend perfectly to produce a nice aesthetic. It would be weird having one strange aspect, such as unique bedding from VisionBedding, if everything else was ordinary. It just wouldn’t match.
It would be ideal for you to provide a consistent theme to your bedroom, and to make sure everything is in line. If you'd like to go for an animal-print theme, make sure to avoid other patterns that don’t match well. It’ll stand out, but not in the way that you want. If the various elements of your room don’t co-operate well, you'll lose the essence of your unique design. In the case of your theme necessarily consisting of various patterns, experiment with them and find which ones match up the best.
- Think Outside the Box
With unique ideas, your primary intension is to veer away from the ordinary. You shouldn't settle for what’s seen as customary, or be swayed too heavily if the initial result is foreign-looking. Say, for example, with your bed. You can escape the usual boxed bed frame simply by going for something different. You can go for a forest theme, wherein the longed foot post looks like a tree branch, and use a bird's nest as your bed; you could purchase a hanging frame, where the mattress is suspended from the ceiling, or even a bed that's incredibly high up which you need to slide down from.
You can be as creative as you like, and remember that there are no rules for decorating your own personal space.
You can also choose different themes that you think you could pull off, such as winter wonderland, lights galore, inside the treehouse, hamster wheel bed, airplane, underwater - to name but a few. There are a ton of creative ways to escape from the norm. The sky's the limit!
- Don't Overlook the Ceiling
When designing a bedroom, many have the tendency to ignore the ceiling and just let it match the whole bedroom color. While this is a safe option, you can always go for better, by providing yourself with a unique ceiling design that'll make your bedroom stand out more.
You can freely play around with textures and lights. One option is to attach a ton of light fixtures to your ceiling, that'll help to make your room warmer or brighter. Nobody ever said you could only have one light. Not only that, but you could opt for neon lights. You can also have a ceiling full of stars when you turn off your primary light, allowing you a view of space as you lay in bed. Having a sky full of stars is an excellent idea if you love the outdoors, or have kids around.
Texture is another important aspect; try adding creative patterns, such as incorporating waves or the woods. You should look into formal art as well; many choose to decorate their living rooms with this kind of décor, but there’s no reason it wouldn’t look good in a bedroom.
A hint of floral or princess vibe to get that princess-royalty theme never goes astray. Whichever theme that you're going for, it's essential to pursue it in every corner of your bedroom.
- Prioritize Curtains, Too
When designing, you might forget the importance of curtains. The curtains also have to blend in with your unique design. If you just can't find the right option, you could even create one on your own. This option will allow you to have the piece that you wanted but also provide a personal touch, as it's truly unique and it's not available anywhere else in the world.
You can create your curtains easily at home. All you need to do is to find the right fabric and learn some basic sewing.
- Have A Proper Color Scheme
As much as you wanted to go crazy with your ideas, it's recommended to go for a proper color scheme to make sure everything is still be pleasing to the eyes.
Say, for example, you're aiming for a deep-forest bedroom design. For this theme, your colors should be mainly different hues of green and brown. This will help to bring the forest vibe to your bedroom. However, if you add an extra touch of color such as pink and purple, it could just ruin the entire aesthetic.
When deciding on a color, consider your theme and determine what your primary colors should be; you can make sure you don’t go wrong with the help of the color theory, and know for sure before you begin which colors will go well with each other. The color theory will be helpful if your idea is incredibly unique, and you’re finding it hard to gain much inspiration color-wise.
- Get Creative with Headboards
The highlight of your bedroom is usually your bed. It's the main focus of the room, and you should put some extra effort into it. If you're planning on having a theatrical theme, then you can design your bed to look like a stage and your headboard as the theater curtain. This will make you feel like the star of the show every single morning.
When deciding on a headboard, make sure that it's the appropriate size and as comfortable as possible, since you'll likely be laying back against it for a while before you actually decide to go to sleep.
- It's Not All About Décor
When decorating for a unique bedroom theme, it's not all about the room décor. Aside from your ceiling, you should consider making your own designs for your walls and flooring. Providing a proper color scheme or design will help to complete the look.
If you're aiming for a pool-inspired room that has ankle-deep water around your bed, for instance, choosing floorings that aren't water-appropriate will end up looking awful. Not only will it not match your bedroom's unique theme, but it could cause damage to your flooring, forcing future expenditure that you could have avoided. You should also pick a wall type that's appropriate for the theme. Choosing a rigid panel wouldn't be a great idea for a pool-themed bedroom, as it won’t blend well and will look inappropriate.
- Don't Forget The Storage
Planning your bedroom’s theme might take your mind off how you'll incorporate storage. You must try to blend your storage options with your bedroom as much as possible, which will allow it to be useful and functional as well as uniquely beautiful.
- Be You
When designing a unique bedroom theme, make sure that it speaks of you. You should be confident that the theme you're going for will be one which you'd like to see for years to come.
You have to commit to your design entirely, and take it seriously. Be sure that what you’ve decided to implement is what you actually want, and that you’re not just choosing it because it looks cool in photos.
Lastly, have fun decorating; you're going to have a one-of-a-kind bedroom, like no other. When it all comes together, all your friends will be envious of your amazing design.
Conclusion
Designing your bedroom can be problematic, most especially if you're aiming for a unique theme with hard-to-find items. Though it can be challenging, the benefits of completing the project will be well-worth the effort. The result will allow you a sense of completion and happiness that you could never have anticipated, and a brand-new personal space, made to suit your individual needs and preferences.
Nobody says that your bedroom theme has to be standard; you can always escape from the ordinary if you try hard enough. With proper fore-thought and determination, you could have the bedroom of your dreams in no time.