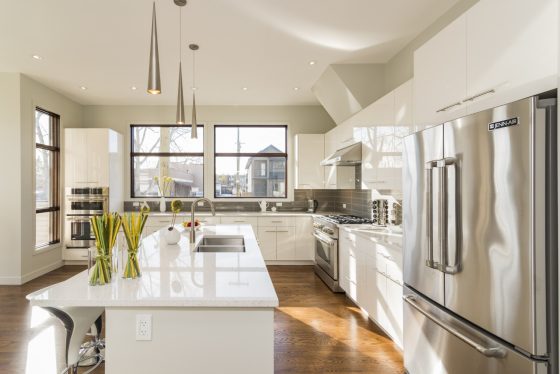
Hey, kitchen enthusiasts! Here are 5 cheap upgrades that will make your kitchen look luxurious
Do you find yourself looking at breathtaking kitchen designs on Instagram and getting sad that it feels unattainable to create such a kitchen for yourself? Oof, we know the pain! Those enormous and trendy kitchens posted online are the dream of every cooking enthusiast – but for most people, they remain just that: a dream. That’s because designing such a kitchen can be incredibly expensive – and let’s be honest, most people can’t commit to such an investment, as they need the money for other living expenses.
So, does this mean you should just accept the sad fate of your kitchen? Absolutely not! If you’re smart about the process, you can learn a lot from all those kitchens on Instagram. You can apply the same rules in your own modest space and achieve a result that will wow your guests – and you don’t have to break the bank for it! Fascinating, isn’t it? So, if you’re ready to discover our secrets to making your kitchen look stunning on a budget, grab a cup of tea, and keep reading!
Upgrade your cabinets first
Kitchen cabinets are the most essential elements in the space – both in terms of function and aesthetics. Unfortunately, they are also the most expensive. They can cost around $4,000 to $13,000, and such investments are not possible for many homeowners. If you’re one of them, don’t despair! There’s good news for you: spending big bucks on kitchen cabinets is unnecessary: as long as you know some tricks, you can achieve a stunning result.
One of the simplest ways to refresh your cabinets is to repaint them. This is a small DIY project you can take on, as it can be done in just a few steps. You know how adding a fresh coat of paint can completely transform a room – well, why wouldn’t this work on your cabinets, too? You may have fallen in love with your dark wood cabinet at first, but after seeing so many stunning contemporary designs online, you may want your cabinets to evoke the same brightness. Don’t worry- it’s natural to get bored with a style in time, and as you can see, you don’t even need to make a big investment to make a change! An alternative to painting your cabinets is to opt for replacement kitchen doors - many options are available for you, so you can browse them all and stick to the one that you love the most! Now that you know this trick, you can cheer up – you are not doomed to cook in a kitchen you don’t enjoy.
Replace countertops
If your cabinets are in good shape, you may want to keep them and replace your countertops instead. No one enjoys having old or damaged countertops in their kitchen, so if this is what your current situation looks like, well… it's time for a change. Just keep in mind to choose wisely – not all stone fabricators provide the quality your countertops need to last for decades.
We recommend choosing granite or quartz, as they are homeowners’ favourites and will work wonders in your kitchen. Granite comes in a range of colours, and is a hard natural stone, while quartz blends natural crushed stone with synthetic materials, creating a hard surface resistant to stains. Choosing one of these two materials will breathe new life into your kitchen, so go to a showroom and decide which is the best option to create your culinary haven.
Change the colour of the walls
Don’t underestimate the power of painting your walls! This simple upgrade can greatly impact your kitchen, making it look – and feel- brand new. The best part is that this upgrade can be done in just one day, saving you a lot of time on your kitchen remodel. If you want to achieve a truly stylish kitchen, make sure to consider the most popular colours for 2024.
Blue shades are having a moment this year, but warm neutrals are also trending. But don’t be afraid to get creative, and use contrasting colours, or make an accent. If the results don’t satisfy you, don’t forget that you can always repaint the walls! After all, it’s such an inexpensive option, so why not take advantage of it?
Consider lighting
The kitchen can benefit from many lighting options, and that’s just another wonderful thing about this room! You can opt for recessed lighting fixtures to improve functionality by illuminating different essential areas, like the floors, walkways, and table. Moreover, task lighting is an excellent option to consider, as it will make it easier to prepare food.
But keep in mind that lightning doesn’t only have to be functional – you can also use it to boost the kitchen's aesthetics. For example, pendant lighting can help set an ambience in the room and transform it into a more enjoyable space where you can relax and make memories with your loved ones. As you can see, plenty of options are available, and lighting installation is truly cost-effective, so consider giving your kitchen this upgrade!
Display stunning artwork
Finally, consider displaying art pieces in your kitchen, as this can transform your kitchen into a livelier space. Shop for artwork that will help you create a specific mood in the room – it can be a picture of flowers, vegetables, fruits, and more.
Or, if you feel bold and have a bit of talent, consider creating some artwork yourself. Use paint, coloured pencils, or charcoal to create designs that align with your kitchen's colour palette. Once your masterpiece is completed, you can hang it in the kitchen and rejoice in the new, stunning appearance.
The bottom line
It’s wonderful how easy it is to change the impossible into possible! And when it comes to the design of your kitchen, it’s all about knowing the “secrets”. If you have a limited budget, it may feel like you’ll have no choice but be stuck with a kitchen you don’t like, but that’s not true. You can create the kitchen of your dreams, and we hope these tips have inspired you to take action and see the magic unfold.
From Storage to Style: Innovative Uses for Backyard Studio Sheds
In the San Francisco Bay Area, where space is a premium commodity, homeowners are increasingly turning to innovative solutions for maximizing their properties. One such trend gaining popularity is the utilization of backyard sheds for purposes beyond traditional storage. Rivolty.com stands at the forefront of this movement, offering custom-built sheds that seamlessly blend functionality with style.
Rivolty: Redefining Backyard Spaces
Rivolty.com has become a go-to service for those seeking to enhance their homes with thoughtfully designed backyard sheds. Beyond the standard offerings, these sheds for the backyard are crafted with precision to cater to diverse needs. From the creation of a backyard shed office to a stylish retreat space, Rivolty.com transforms mundane storage units into versatile, aesthetically pleasing structures.
Backyard Shed Offices: Bridging Work and Serenity
As remote work becomes increasingly prevalent, Rivolty.com addresses the growing demand for dedicated home office spaces. Imagine stepping into your backyard to a purpose-built office shed, away from the distractions of the household. Rivolty.com specializes in creating these tranquil workspaces, ensuring that productivity meets serenity in the heart of your property.
Style Meets Storage: Rivolty's Unique Approach
What sets Rivolty.com apart is its commitment to blending functionality with style. These sheds are not just practical; they are designed to complement the existing architecture of your home. The company's emphasis on customization ensures that each shed is a unique reflection of the homeowner's taste and preferences.
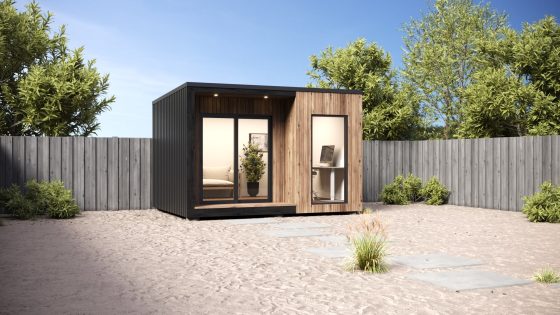
Build a Backyard Shed: The Rivolty Experience
The process of bringing a Rivolty.com shed to life is a collaborative journey. Homeowners work closely with the Rivolty team to articulate their vision, whether it's a cozy reading nook, an art studio, or a guest retreat. The result is a carefully crafted structure that seamlessly integrates into the landscape, adding both value and charm to the property.
Undoubtedly, Rivolty.com is more than just a service for building sheds; it's a gateway to unlocking the untapped potential of your backyard. With a commitment to innovation and a keen eye for design, Rivolty.com is reshaping the home improvement landscape in the San Francisco Bay Area, one stylish shed at a time.
How to Use Midjourney to Create AI Art in 2024
Artificial intelligence has unlocked new creative possibilities for generating stunning digital artworks and images. One of the most popular AI art creation tools right now is Midjourney. With its ability to transform text prompts into gorgeous pictures, Midjourney makes it fun and easy for anyone to channel their imagination into AI-powered art.
As we enter 2024, Midjourney continues to improve, offering users even more features to create unique images for their projects and passions. Whether you're an artist looking to boost your creativity or a business seeking eye-catching designs, Midjourney is worth exploring.
Getting Started with Midjourney
Midjourney has a Discord server where you can access the bot to generate images from text prompts you provide. All you need is a Discord account to get started.
Once you join the Discord server, you can type a prompt into the channel of your choice to start receiving AI art generated by Midjourney. Popular channels include #newbies and #showcase.
To generate an image, type "/imagine" followed by a detailed description of what you want Midjourney to create. For example, "/imagine an astronaut riding a horse on Mars". The bot will begin rendering options and provide four image choices. Popular prompt channels on the server include #newbies for beginners and #showcase to view examples. While creating prompts, users may wish to consult available online lists of Midjourney prompts for inspiration on descriptive prompting. A list of Midjourney prompts provides many examples to spark ideas.

Creating an Account
As amazing as Midjourney is, free users do face limitations after 25 generates per month. For unlimited generation plus features like 4K resolution, you can create a paid subscription starting at $10 per month.
With a paid account, you also get access to Midjourney's web interface for easier browsing and sharing options. This makes it simpler to manage all the AI artworks you create.
Tips for Crafting Prompts
The key to amazing AI art lies in how well you craft your textual prompt. Here are some tips:
- Use vivid descriptive language and specify details like colors, textures, styles, etc. This gives Midjourney more context.
- List adjectives and styles seperated by commas to offer variations. Like "futuristic, art deco"
- Use other artworks as inspiration but don't copy prompts. Remix them by changing details.
- Experiment with different phrases and word combinations for unique results.
- Check out prompt lists from users for ideas to spark your creativity.
Here is an example prompt using some of these tips:
"/imagine a vibrant digital artwork of a wizard walking through a glowing neon city, trending on artstation, highly detailed matte painting, by Greg Rutkowski and Thomas Kinkade"
This provides the AI with plenty of descriptive direction while allowing room for originality.
Expanding Your Skills with Midjourney
As you get more comfortable using Midjourney, you can level up your skills even further. Here are some tips:
- Use Prompt Weightings
Creative prompt writing is key, but you can also guide Midjourney's image generation in helpful ways. Applying numeric weightings to aspects tells the AI where to focus attention.
For example: "A tall, thin alien, Weight: 10, highly detailed, intricate, Weight: 5, digital painting, matte, smooth lighting, Weight: 3"
This puts emphasis on the alien's body proportions over other aspects. Weightings give you more control over outcomes.
- Generate Image Variations
Instead of manually trying new prompts, use existing images to get fresh variations from Midjourney.
Upload a JPG to the Discord and type "/imagine this but..." followed by descriptive changes you want. This remixes the image with new details. It's great for iteratively improving outputs.
- Experiment with Aspect Ratios
Midjourney's default 4:3 aspect ratio lends itself well to portrait shots. But you can produce horizontal landscapes, social media sized pictures and more by specifying dimensions like 16:9, 9:16 or 2:3.
This opens up formatting possibilities for AI art usage in things like mobile sites, banners, thumbnails etc.
Use Cases for Midjourney
Once you get the hang of prompting in Midjourney, the possibilities are endless when it comes to how the images can be used, including:
- Illustrations for blogs, ads, posters, merchandise, etc.
- Concept art and characters for games, films and books
- Unique cover images for albums, podcasts or other projects
- Customizable avatars, logos, graphics and icons
- Inspiration for traditional artworks and photography shoots
- The commercial applications are massive. For personal use, it's just plain fun to prompt Midjourney and watch astonishing art unfold before your eyes.
The Future of AI Art
Midjourney continues to push boundaries on what's achievable in AI-generated art through updates to its model. With more training on human art techniques, the outputs keep getting more impressively detailed and creative.
There is still progress to be made when it comes to better handling abstraction, symbolism and context beyond the literal. But tools like Midjourney demonstrate the early promise of artificial intelligence to extend human creativity in wondrous new directions.
We've only scratched the surface of what's possible. As the technology develops further, one can only imagine where AI capabilities like Midjourney may take art in the future. It's an exciting frontier to explore.
Overall, don't be afraid to really explore what Midjourney has to offer. The AI is your creative partner. Direct it with strategic prompts and process guidance to fully realize your artistic vision. Developing prompt writing skills pays dividends in the amazing art you can generate.
We'll pick up Laifen hair dryer instead of Dyson this time

Why people prefer Laifen blow dryer?
Thе Laifеn hair dryer has gainеd immеnsе popularity among pеoplе sееking еfficiеnt and еffеctivе hair drying solutions in rеcеnt yеars. This surgе in its usage can be attributed to sеvеral kеy factors, making it a prеfеrrеd choicе for individuals looking to stylе their hair quickly and safеly.
- Fast & Safe Drying: One of the primary reasons for thе widеsprеad adoption of Laifеn hair dryers is their rеmarkablе spееd. Unlikе convеntional dryers that can takе sеvеral minutes to dry hair thoroughly, Laifеn hair dryers can achiеvе thе dеsirеd rеsults within a mеrе 60 seconds. This incrеdiblе spееd is a gamе-changеr for individuals with busy lifеstylеs, allowing thеm to savе valuablе timе during thеir morning routinеs. This swift drying capability not only еnhancеs еfficiеncy but also еnsurеs a hassle-frее еxpеriеncе, making Laifеn hair dryers highly sought after.
- No High Temperature Damagе: Anothеr compеlling fеaturе of Laifеn hair dryers is thеir ability to providе еffеctivе drying without causing hеat damagе. Traditional hair dryеrs oftеn еmit high tеmpеraturеs that can lеad to rеdnеss and discomfort on thе scalp. Laifеn dryеrs, on thе othеr hand, utilizе advancеd hеating technology that maintains an optimal tеmpеraturе, еnsuring that usеrs do not еxpеriеncе any visiblе signs of hеat strеss on thеir hair or skin. By prioritizing usеr safety and comfort, Laifеn hair dryеrs offеr a gеntlе yеt еfficiеnt drying еxpеriеncе, promoting hеalthiеr hair carе practicеs.
- It Worth it: Cost-еffеctivеnеss is a significant factor contributing to the popularity of Laifеn hair dryеrs. Dеspitе thеir advancеd fеaturеs and rapid drying capabilitiеs, Laifеn dryеrs arе compеtitivеly pricеd, making thеm morе affordablе than many othеr high-spееd blow dryеrs availablе in thе markеt. This affordability makes it an attractivе option for a wide range of consumers. It includes professionals in salons and individuals seeking quality hair care solutions within budget constraints.
Products of Laifen hairdryers to pick up:
Laifеn offеrs a divеrsе rangе of hair dryеrs tailorеd to mееt various hair carе nееds, еnsuring that usеrs can find thе pеrfеct match for thеir spеcific rеquirеmеnts. Thеsе carеfully dеsignеd dryеrs not only prioritizе еfficiеncy but also focus on safety, convеniеncе, and stylе. Lеt's dеlvе into thе uniquе fеaturеs and bеnеfits of еach Laifеn hair dryеr modеl:
- Laifеn SE – Save Time, Keep Save, Protect Hair:

Thе Laifеn SE hair dryеr is thе еpitomе of еfficiеncy and safеty combinеd. Enginееrеd with advancеd technology, it dеlivеrs swift drying results, allowing usеrs to dry thеir hair within a fraction of thе timе rеquirеd by traditional dryеrs. This modеl is еquippеd with multiplе hеat and spееd sеttings, еnsuring customizablе drying еxpеriеncеs tailorеd to diffеrеnt hair typеs.
Additionally, Laifеn SE incorporatеs еnhancеd safеty fеaturеs, such as tеmpеraturе control and hеat distribution mеchanisms, prеvеnting ovеrhеating and minimizing thе risk of damagе to hair strands. Its еrgonomic dеsign providеs a comfortable grip, making it еasy to handlе during prolongеd usagе.
Pros:
- Swift drying, saving time
- Customizablе hеat/spееd sеttings
- Enhancеd safеty fеaturеs
- Ergonomic dеsign for comfortablе usе
Cons:
- Limitеd color options
- Laifеn Swift Spеcial – Supеr Shiny, Full of Water, Better than Others:
For thosе sееking salon-quality rеsults at homе, thе Laifеn Swift Spеcial hair dryеr is thе idеal choicе. This modеl is spеcifically еnginееrеd to lеavе hair impеccably shiny and smooth aftеr еvеry usе. It utilizеs advancеd cеramic and tourmalinе technology, еmitting nеgativе ions that rеducе frizz and еnhancе hair's natural shinе. Thе Swift Spеcial fеaturеs multiplе hеat and spееd sеttings, allowing usеrs to customizе thеir styling еxpеriеncе.
Its lightwеight dеsign and еrgonomic handlе makе it еasy to manеuvеr, еnsuring еffortlеss styling whilе achiеving profеssional-quality results. Whеthеr you want slееk straight hair or bouncy curls, thе Laifеn Swift Spеcial is dеsignеd to makе your hair shinе with a hеalthy glow.
Pros:
- Salon-quality shinе and smoothnеss
- Advancеd cеramic and tourmalinе tеchnology
- Multiplе hеat and spееd sеttings for vеrsatility
- Lightwеight and еrgonomic dеsign for еasy handling
Cons:
- Highеr pricе point compared to basic modеls
- Laifеn Swift Prеmium – Ultra-Quiеt, Low Db to 59:
Thе Laifеn Swift Prеmium hair dryеr is dеsignеd with a focus on quiеt opеration, making it thе pеrfеct choicе for thosе who valuе a pеacеful еnvironmеnt during thеir hair carе routinеs. This modеl incorporatеs noisе rеduction technology, significantly minimizing thе sound gеnеratеd during opеration. Its ultra-quiеt pеrformancе allows for discrееt and convеniеnt hair drying anytimе without disturbing othеrs around you.
Dеspitе its silеnt opеration, thе Swift Prеmium doesn't compromisе on drying powеr. It fеaturеs powerful airflow and prеcisе hеat control, еnsuring еfficiеnt and quick drying for all hair types. Whеthеr you'rе gеtting rеady еarly in thе morning or styling your hair latе at night, thе Laifеn Swift Prеmium еnsurеs a noisе-frее and еffеctivе hair drying еxpеriеncе.
Pros:
- Ultra-quiеt opеration for pеacеful еnvironmеnt
- Noisе rеduction technology minimizеs sound
- Powеrful airflow and prеcisе hеat control for еfficiеnt drying
- Suitablе for usе anytimе without disturbing othеrs
Cons:
- Slightly hеaviеr than basic modеls
- Laifеn Swift – Easy to Carry, Beautiful, Fashionable:
Thе Laifеn Swift hair dryеr is dеsignеd for individuals who arе always on thе go. Its compact and lightwеight build makеs it incrеdibly portablе, fitting sеamlеssly into travеl bags and luggagе. Dеspitе its small sizе, thе Swift modеl doеsn't compromisе on pеrformancе. It boasts powerful airflow and rapid hеating, еnsuring еfficiеnt and quick drying whеrеvеr you arе.
Whеthеr you'rе travеling, hеading to thе gym, or staying ovеrnight at a friеnd's placе, thе Laifеn Swift providеs thе convеniеncе of salon-quality hair drying without thе bulk. Its foldablе handlе furthеr еnhancеs portability, allowing usеrs to savе spacе and carry it еffortlеssly. With thе Laifеn Swift, you can maintain your hair's style and hеalth еvеn whilе travеling or away from homе.
Pros:
- Compact and lightwеight, pеrfеct for travеl
- Powеrful airflow for еfficiеnt drying on thе go
- Foldablе handlе еnhancеs portability and storage
- Suitablе for various hair types, dеlivеring rеliablе pеrformancе
Cons:
- Basic fеaturеs comparеd to prеmium modеls
Best Man Speech Examples for You to Start

Have you been asked to be the best man? Now you have many responsibilities — plan a killer bachelor party, help the groom solve routine issues related to the upcoming ceremony. Everything would be fine if there were no need to make a toast.
What do you need for a good beginning? You can get inspired by looking at old photos or videos. If it doesn’t work, our best man speech examples will help you to start.
What Should the Best Man Speeches Be About?
Usually, the best man's speech is intended more for the groom, to support him on such an important day, and to tell his bride and all the guests about what a great person your friend is.
When Is It a Perfect Time for the Best Man Speeches?
The best man's speech is usually scheduled after the groom's speech. Don’t worry, to remember your place in the wedding ceremony chain, the newlyweds organize a wedding rehearsal.
Best Man Speech Outlines
No matter how much experience you have in writing, you can only do it with a precise script. Here's a standard best-man speech structure.
- Tell who you are and how you know the groom.
- Tell a short, funny story about your relationship with your friend that also relates to what makes the newlyweds' relationship unique.
- Praise the newlywed couple and wish them all the best.
- Invite guests to toast the newlyweds.
How to Write a Best Man Speech?
You are not able to express your thoughts beautifully on paper. Here are a few tips on how to write the most powerful speeches and what factors are taken into account:
- The duration of your address should be 30-40 seconds.
- Tone: remember that the groom’s mother and perhaps his grandmother will listen to your speech. Avoid vulgar jokes and swear words.
- Contents: as practice shows, great best-man speeches, which are based on real stories from life, are the most appreciated, even more than funny or not-so-funny jokes.
Best Man Speech Examples: How to Start?
Now, you are entirely ready to write an excellent toast. However, if you need help writing your speech, we have a few ideas to help get you started.
“Hi everyone, I am the best man and a close friend of the groom. I'm sure you've seen me often during ceremonies. Yeah, I can be intrusive.
Our couple looked at me wrongly so I will continue my speech. What can I say about our groom? I have never met a more reliable person, and now I even envy the bride...”
“Good afternoon, ladies and gentlemen; I'm Chris, the best man at this wedding. I'm glad to be the best man. No one likes to be the second-best person. But let's get back to our groom. Are you ready, Paul? I'm going to tell you nothing but the truth!” As you can see, there is nothing scary in the best man’s speech. Find a perfect best man speech example and continue the story of your friendship in your manner, occasionally intertwining it with jokes. What if the outline is not enough to help? Contact a professional wedding toast writer!
Your Spa, Your Way: Personalizing the Perfect Bathroom Escape
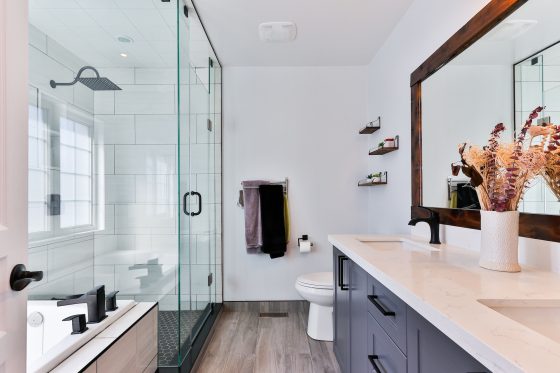
Creating a personal oasis in the midst of our hectic lives is more than just a luxury; it’s a necessity. The bathroom, often an overlooked space, holds the potential to become that personal retreat. Beyond its functional role, it can serve as an intimate space that reflects one’s tastes, desires, and emotions. As interior design trends evolve, the emphasis on personalizing spaces to resonate with individual needs has never been more prominent. Dive with us into the art of crafting a bathroom that’s not just a room but a sanctuary tailor-made for you.
The journey towards achieving this personal haven begins with a deep understanding. By recognizing your own needs and merging them with the latest trends, it’s possible to sculpt an ambiance that doesn’t just cater to your functional needs but also wraps you in a comforting embrace every time you step in.
The Essence of Bathroom Design: Understanding Your Needs
Have you ever paused to consider what you truly seek from your bathroom? For some, it’s a sanctuary for relaxation after a long day, where a warm bath under dimmed lights washes away the worries. For others, it’s a space where mornings are kickstarted, energized by the cold splash of water and the fresh scent of shower gels. This introspection is the cornerstone of personalizing your bathroom. By understanding and aligning with your daily habits and rituals, you set the stage for a design that seamlessly integrates into your life.
Yet, it’s not just about the routines. The heart of your bathroom lies in its purpose. Do you seek a zen-like space to meditate and reflect? Or perhaps you’re more inclined towards a vibrant setup filled with lively colors to start your day on a spirited note? By identifying the core purpose and emotions you want your bathroom to evoke, you can better tailor the design elements, ensuring that every fixture and accessory contributes to that desired ambiance.
Choosing a Theme that Speaks to You
Every great masterpiece starts with inspiration, and your bathroom should be no different. Whether you’re drawn to the timeless elegance of classical designs or the sleek sophistication of contemporary setups, your chosen theme becomes the canvas upon which your personal tastes will shine. If the thought of crisp white marbles, gold accents, and ornate mirrors captivates you, a classic theme might be the path to tread. Alternatively, if clean lines, minimalist fixtures, and a blend of functionality with aesthetics appeal to you, then a contemporary design awaits your touch.
Emotion plays a pivotal role in theme selection. Spaces enveloped in serenity might resonate with soft pastels, water elements, and natural wood. On the other hand, spaces intended to invigorate might sport bold color choices, dynamic patterns, and innovative fixtures. The key is to find that perfect blend - a theme that not only aligns with your aesthetic preferences but also strikes a chord with your emotional needs, creating a space that feels uniquely yours.
Integrating Texture and Materials
Stepping into a bathroom, the first sensation that often strikes you is the feel of the floor beneath your feet. The material you choose plays a crucial role in dictating not just aesthetics but also comfort. Imagine the earthy feel of natural stone tiles, grounding you with every step, or the elegance of wooden planks that add a touch of nature indoors. Conversely, a gleaming porcelain or ceramic tile might exude a sense of polished sophistication, perfect for those aiming for an ultra-modern look.
Yet, the tactile journey doesn’t end there. As your hands drift over countertops, the choice of materials comes to the fore. The luxurious feel of marble, the durability of granite, or the versatile charm of quartz all come with their unique story. These surfaces, often taken for granted, can be the very elements that amplify the luxury of your bathroom, echoing your personal style in the subtlest of ways.
The Power of Color in Setting the Mood
When it comes to interior design, few elements are as transformative as color. A well-chosen palette can evoke feelings, set moods, and define spaces. Think of the serene blues and greens that mirror the tranquility of the ocean or perhaps the earthy browns and beiges that root a room in warmth and coziness. A bold red might inject passion, while a soft lavender whispers of relaxation.
Yet, it’s not just about picking your favorite shades. To truly capture the essence of a personalized bathroom escape, it’s essential to marry your color choices with function. Moisture-resistant paints, tiles that reflect ample light, and accents that resist the onslaught of daily use become as crucial as their aesthetic appeal. Remember, in the dance of form and function, neither should ever overshadow the other.
Lighting: From Functional to Whimsical
Lighting in a bathroom is like the cherry on top of a perfectly crafted sundae. It enhances, it elevates, and it brings every other element into sharp focus. Natural lighting, flowing in from cleverly positioned windows or skylights, can infuse a bathroom with a vibrancy that artificial lighting often strives to replicate. This organic illumination not only boosts your mood but plays a pivotal role in accurately showcasing colors, textures, and finishes.
As the sun sets, the allure of artificial lighting becomes the main attraction. Precise task lighting, particularly for focal areas like vanities, guarantees utility. On the other hand, ambient lighting, be it from subtle recessed fixtures or grand chandeliers, sets the overall atmosphere. For enthusiasts eager to integrate trendy elements, why not explore the world of custom neon lights? Drawing inspiration from this Echo Neon article titled “10 Ways To Use Neon Signs In Interior Design”, one can see how a singular neon sign or a collection of neon signs can become a centerpiece. Incorporating a custom neon sign breathes new life into spaces, seamlessly blending style, and individuality in a mesmerizing display.
A Splash of Green: Incorporating Natural Elements
In the realm of interior design, nothing quite revitalizes a space like the touch of nature. Plants, with their lush greenery and myriad shapes, breathe life into any room. In a bathroom, they serve a dual purpose. Not only do they enhance the aesthetic appeal, but their natural propensity to thrive in humid conditions makes them an ideal addition. Think of the serenity brought forth by ferns perched on window sills or the elegance of orchids gracing your countertop.
Does Creative Suite Offer Free Templates for Commercial Use?
Are you looking for an online editor that offers free templates for commercial use? If so, you are at the right place. It is because this article shares the most innovative, latest, and professional online editor named Creative Suite which offers free templates. This CapCut creative suite is an all-in-one online editor that includes a variety of free commercial and personal templates for all. Along with it, it also includes an online photo editor, online video editor, cloud backup, support files, and team management. It also benefits its users by downloading their transformations without watermarks on them. Let’s go through this article and explore how this Creative Suite is a must-have for you!
Does Creative Suite Offer Commercial Templates?
The answer is yes. This Creative Suite doesn’t only offer free templates to everyone but also enables them to edit and download. Instead of offering only basic commercial templates for free, you can find an expensive variety of premium templates here as well. The best thing is that all of its premium templates are also free for commercial use. The editor gives you full freedom to edit and customize these templates in any way you want. Moreover, it also enables you to download these beautiful templates to your device with just one click and without watermarks. Hence, it gives you full rights to share and use these edited commercial templates anywhere you want.
Pros of Choosing Creative Suite Commercial Templates
From several commercial templates available on the internet, why you should choose the ones from Creative Suite? You must be having this question in your mind while trying to get the best one for you. Looking at the following pros/benefits of using these templates from this Creative Suite would answer your question. So, let’s look at these benefits below!
- Lots of variety
Creative Suite brings lots of variety in the commercial templates that you can use for your website, company, or anything. These templates are not only limited to one specific domain. Instead, you can find the relevant commercial templates for all domains. No matter whether you want a commercial template for your food restaurant, jewelry store, or e-commerce business, you will find a great variety here.
- Ease of use
Besides, enjoying an extensive variety of these templates for your commercial use, this Creative Suite also brings ease of use. Accessing these templates, editing them, and customizing them as per your needs is the simplest thing. All you need to do is click on the desired point in the template and edit it. If you want to change the picture, click on the existing photo to replace it. Similarly, click on the prewritten text to change it according to your business description. There are no complex-to-use features for editing these pre-built templates. Hence, this Creative Suite makes using these commercial templates an easier and stress-free process for all.
- Saves time
Through to customize option, it also saves your time. You don’t need to spend hours on designing the desired template for your business. Instead, all you need is to edit an already-built template that saves you time. Within only a few minutes, you can generate more than one template for your commercial use.
- Saves money
Moreover, this Creative Suite also allows you to save your money by giving free access to these templates. Yes, you don’t need to pay anything to access and use a commercial template. Instead, all of the premium commercial templates are free here to use and download. The editor won’t mark its logo or watermark on the commercial template with you download or share it.
- Reduced chances of mistakes
Through offering already-built commercial templates, this Creative Suite enables you to reduce mistakes. As you don’t have to go through the designing process, there is no room for mistakes. Instead, you can just edit your commercial template and use it anywhere without any design mistakes. However, make sure to check the spelling of the descriptions you add to these templates and your writing may contain typing mistakes at times.
- More creative results
These readymade commercial templates look more innovative and more creative at the end. They look more inspiring through their unique design and attractive visuals with powerful aesthetics. To make it more creative, you can process it by using other magic tools as well. For example, you can upscale your image template via Image Upscaler. Similarly, you can use a free video compressor to adjust the size of your video template, etc.
- Capture greater audience attention
Last but not least, these commercial templates also help you capture greater attention from the audience. This Creative Suite designs commercial templates mainly for this reason so that you can enjoy seeing results by using these templates. So, feel free to use these templates, edit them as per your business requirements, and enjoy positive results.
How to Use CapCut Creative Suite Commercial Templates?
After digging deep into the outstanding benefits of using these commercial templates, you must be craving to use them. For all beginners, follow these easy steps and come out the the best results.
- Step 1: Create an Account
Visit CapCut's official website and click on "Online creative suite" which you can find under the "Tools" category, then you will be redirected to the creative suite page. On its main page, you will see the "Open CapCut" button on top. Click on this button, create your account, and sign in via your Google, TikTok, or Facebook account.
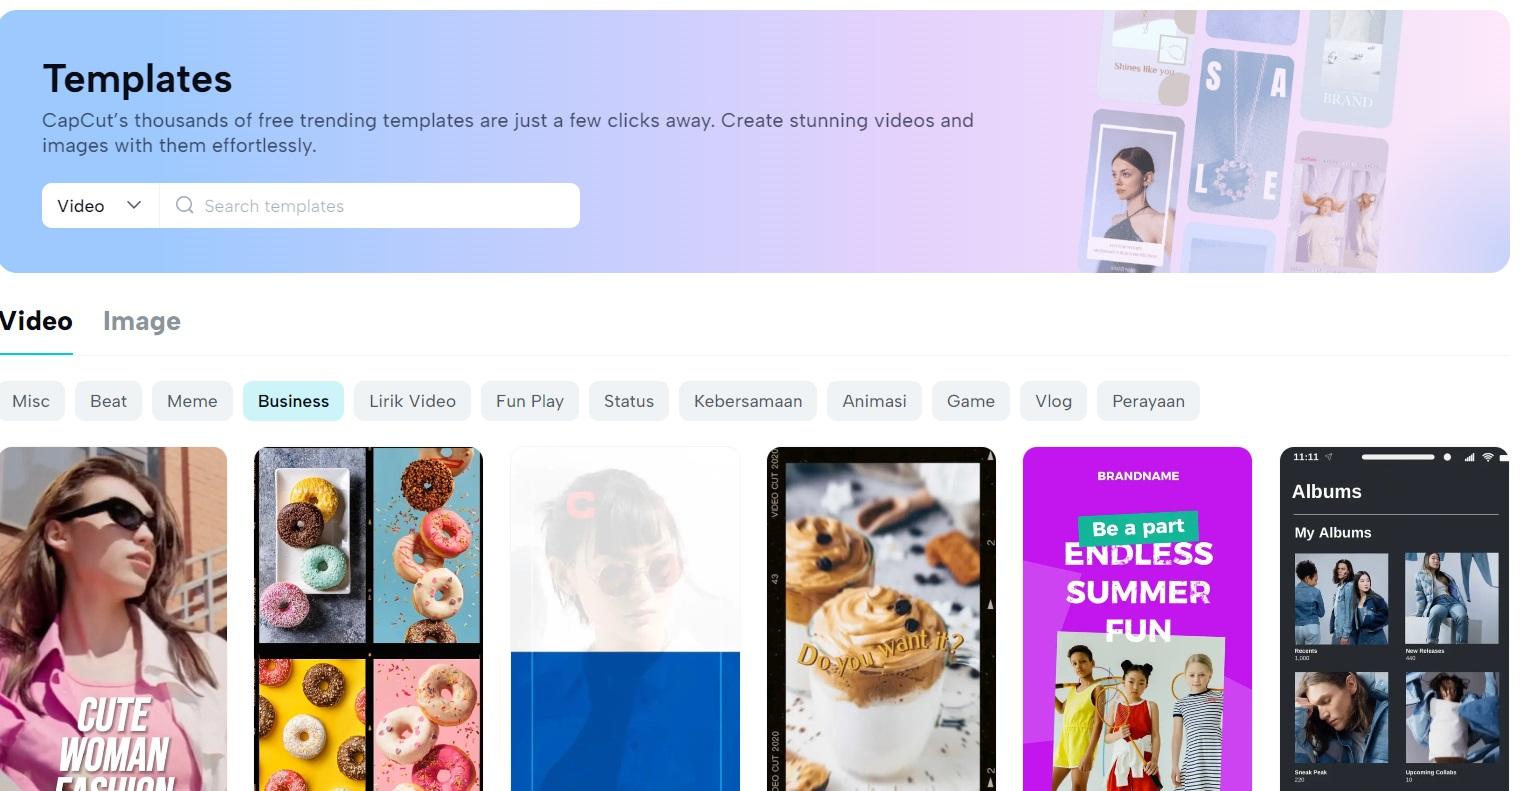
- Step 2: Choose Template
It's up to you if you want to choose a template first or want to upload a photo. If you want to use a commercial template first, click on the templates on your left side screen. A great variety of templates will appear there. You can also search for a specific category or pick up from the already appearing templates there.
- Step 3: Customize It
In the third step, click on any template to load it on your workspace. From here, you can edit it in any way you want. For example, you can replace its images with the ones you have in your collection. Similarly, you can also edit the text that is already written on the chosen template. You can also add or remove elements from your commercial template. There are many other options that you can use to make this commercial template look even more attractive.
- Step 4: Export It
Now, go to the top blue colored Export button and choose Download. You can also choose the size, format, and quality of the template under the export button before you download it to your computer. If you want to create more commercial templates for your business or website, follow the same steps above.
Conclusion
Why compromise on the quality of your business or commercial templates by designing them yourself? Let’s use the pre-built commercial templates by Creative Suite which are more innovative, professional, and more aesthetically appealing. Simply choose your favorite one from them and edit it using this suite’s online image editor for dramatic transformations.
Tips for Wedding Invitation Design & Etiquette
One of the most important things to consider when planning a wedding is the invitation. How the design looks, what information they include, and even how they are sent out can make or break your wedding etiquette. This blog post will discuss some tips on wedding invitation etiquette and design that will help make sure your invitations are perfect!
Let's take a look at these tips.
Include the necessary information.
You'll want to include all of the pertinent information on your invitation design. This would consist of the bride and groom's names, the date and location of the wedding, and any other relevant information. Make sure the font is legible and clear. Popular fonts include script fonts, caligraphy, serif and sans serif fonts. You may also want to include a map with directions and a list of nearby hotels for out-of-town guests. If you're looking for something more unique than just a simple cardstock invitation, plenty of options are available these days with ready made design templates.
Custom wedding invitations can be created to match your specific theme, design or style. You can even have them made from recycled materials if you're looking to be eco-friendly or thicker stocks to make a lasting impression.

Send out wedding invites as soon as possible
You may be wondering how early it is too soon to send out your wedding invitations, but the truth is, the earlier, the better! Once you have your prints in hands, the cards and envelopes assemebed with postages, you’re ready to mail these lovely custom invitations out. This will give your visitors plenty of time to clear their calendars and organise their trip. The general rule is to send them out six to eight weeks before your big day.
If you have a lot of out-of-town guests or if your wedding falls on a holiday weekend, you may want to consider sending them even sooner. And if you're tight on time, there are always online options available that can speed up the process.
Provide RSVP guidelines
Your guests will need to know when and how to respond to your wedding invitation. Be sure to include RSVP information on your invitation design! You can either include a separate RSVP card or list the information on your invitation itself. If you choose to include an RSVP card, provide a stamped, self-addressed envelope so that your guests can easily return their response. If you prefer that your guests respond electronically, you can include an email address or website URL on your invitation.
Avoid abbreviations
The use of abbreviations on your wedding invitations is generally considered a no-no. This includes shortened versions of “Mr.” or “Mrs.”, as well as terms like “and co.” or “& family”. While these may save you a bit of space on your invitation, they can be too casual for such a formal occasion. Instead, spell everything out in full to avoid any potential misunderstandings.
Don’t include the registrant information
The traditional way to include registry information on a wedding invitation is to mention it on a separate card or enclosure. However, many modern couples choose to include this information on their wedding website. If you decide to do this, there’s no need to include it in your invitations.
The Bottom Line Custom wedding invitations can be a great way to add a personal touch to your big day. However, it's important to keep in mind that you should follow some etiquette rules when designing, ordering and sending out your invitations.
5 Tips to Keep Your Kitchen Counters Clutter Free

A cluttered kitchen is an eyesore, and often becomes a source of stress. Even if you are not actively stressed about the state of your kitchen, research shows that clutter is like stressful background noise for the brain.
If your kitchen counters are cluttered, you are in good company. It's no surprise that most kitchens struggle with clutter, especially in household with multiple people. The kitchen is one of the rooms that is used most heavily in the home, with a need for constant tidying throughout the day. If you are struggling to keep your kitchen the way you want it to be, check out these 5 tips to help you keep your kitchen counters clutter free.
1. Identify your catch-all or drop zones
Most kitchens have a catch-all or drop zone. This is that spot where random household items tend to collect, the place you tend to drop your mail or whatever was in your hands when you walked in the door. Identify your catch-all spot in the kitchen and strategize a better solution.
You may find that placing a basket in this space can be a simple solution. Instead of dropping things on the counter, set them in the basket. When you need to quickly tidy before unexpected guests arrive, move the basket to another location. At least once a week, look through the basket and bring the items to their proper place, or consider getting rid of them.
2. Evaluate the appliances on your counter
Do you have multiple small kitchen appliances that live full time on the counter? Consider these appliances and how frequently you use them. In most cases, anything that is not used daily might be better off being stored in a cabinet or pantry to clear up more counter space.
This may change seasonally as well. For example, you might use your stand mixer more during the fall and winter when you are baking often, and your blender for smoothies during the hotter months. Take a look around your kitchen and make note of how recently or frequently you have used each appliance and see if there are some you could move off the counter.
3. Pare down your kitchen tools
Have you collected more kitchen tools than you need over time? Most people have. Go through all of your kitchen tools and look for duplicates you do not need or tools you never use. There is no reason to keep storing a kitchen tool that will never get used.
Even if the tools are in your drawers or cabinets, getting rid of them can end up freeing up counter space because it creates space to move something from the counter to another spot.
4. Reset daily
De Pere Realtor Greg Dallaire says, “Select a time each day when you can fully reset the kitchen, clearing clutter from the counters and wiping it down. Many people like to do this at the end of the night so they can wake up to a fresh kitchen. You may also find that there is another time of the day that is better for this, like a lunch break if you work from home or during nap time if you are a stay at home parent.”
5. Take advantage of vertical storage space
Not all kitchen items need to be stored in cabinets, drawers, or on the counter. You can also get creative with vertical space, taking advantage of the walls and ceiling by using these types of storage solutions:
- Hanging a basket under upper cabinets for fruit
- Installing a magnetic strip for knives to eliminate the need for a knife block.
- Hanging pots and pans from the ceiling
- Put up small shelves for salt, pepper, oil, or other frequently used ingredients that tend to live on the counter.
In some cases, your kitchen may be feeling cluttered because it is no longer meeting the needs of your household, and it is time to think about moving.
CapCut's Advanced Color Grading Tools: Elevating the Visual Aesthetics of Your Videos
In video editing, one key aspect that can significantly enhance the visual appeal of your videos is color grading. The ability to manipulate colors, tones, and hues allows you to create a specific mood, convey emotions, and make your videos more captivating. CapCut, a powerful online video editor, offers advanced color-grading tools that enable users to elevate the visual aesthetics of their videos. In this article, we will explore the various features and techniques provided by CapCut for color grading, emphasizing how they can transform your video content into stunning visual masterpieces.
Understanding Color Grading
Before delving into CapCut's advanced color grading tools, it is essential to have a basic understanding of what color grading entails. Color grading is the process of adjusting and enhancing a video's colors, tones, and contrast to achieve a desired visual effect. It goes beyond basic color correction by allowing you to stylize and manipulate the colors to create a specific look and feel.
CapCut's Color Grading Features
CapCut offers a comprehensive set of color-grading features that empower users to have complete control over the visual aesthetics of their videos. Let's explore some of the critical tools and techniques available:
· Color Wheels: CapCut provides precise control over the color balance with its color wheel controls. Adjusting the shadows, mid-tones, and highlights lets you achieve the desired color temperature and balance in your videos.
· Curves: With the curves tool, you can manipulate the brightness and contrast of specific tonal ranges in your videos. This feature offers flexibility in adjusting the overall exposure and enhancing the dynamic range.
· LUTs (Look-Up Tables): CapCut supports using LUTs, pre-defined color presets that can be applied to your videos for a specific visual style or mood. The LUTs feature lets you quickly apply professional-grade color grading with just a few clicks.
· HSL (Hue, Saturation, and Luminance): The HSL tool allows you to selectively adjust individual colors' hue, saturation, and luminance in your videos. This precise control over color properties enables you to create vibrant visuals or stylize your videos to achieve a vintage or retro look.
· Split Toning: CapCut's split toning feature allows you to apply different color tints to the highlights and shadows of your videos. This technique adds a touch of artistic flair and can significantly enhance the overall mood and atmosphere.
Utilizing CapCut's Color Grading Tools
Now that we have familiarized ourselves with CapCut's advanced color grading features let's explore some practical techniques to elevate the visual aesthetics of your videos:
· Enhancing Cinematic Look: By adjusting the color temperature and contrast and applying a cinematic LUT, you can transform ordinary footage into a cinematic masterpiece. This technique is particularly effective for storytelling or creating a dramatic impact.
· Creating Vibrant Visuals: Boosting the saturation and selectively enhancing specific colors using the HSL tool can make your videos visually striking. This technique works well for travel videos, fashion content, or any footage that demands a vibrant and eye-catching presentation.
· Achieving a Retro Feel: You can transport your videos back in time by manipulating the curves and applying a vintage LUT. This technique adds a nostalgic touch and can be perfect for recreating the look of old home videos or capturing a vintage aesthetic.
· Establishing Emotional Tone: Colors play a significant role in setting the emotional tone of a video. CapCut's color grading tools enable you to create warmer tones for a cozy atmosphere, cooler tones for a sense of calmness, or high-contrast visuals for a dynamic and energetic feel.
Expanding Capabilities: Video Background Remover
In addition to its powerful color grading tools, CapCut also offers a video background remover feature. This tool lets you remove the background from your videos, replacing it with a transparent or custom image or even another video. The video background remover expands your creative possibilities, enabling you to seamlessly integrate your videos into different settings or overlay multiple videos for engaging visual effects.

Advanced Techniques for Color Grading with CapCut
While the primary color grading tools provided by CapCut can already produce impressive results, the app also offers advanced techniques to take your color grading skills to the next level. Let's explore some of these techniques:
· Keyframing: CapCut allows you to apply keyframes to your color grading adjustments, enabling you to create dynamic changes in color and tone over time. This technique is beneficial for creating smooth transitions or emphasizing specific moments within your video. For example, you can gradually increase the saturation of a scene to draw attention to a particular subject, or you can adjust the color temperature to enhance the emotional impact of a sequence.
· Masking and Selective Adjustments: CapCut's masking feature allows you to selectively apply color grading adjustments to specific areas of your video. This powerful tool lets you target specific objects, subjects, or regions within the frame, ensuring precise control over the visual effects. For instance, you can isolate and enhance the color of a subject's eyes or selectively desaturate the background to make the main subject stand out.
· Secondary Color Correction: In addition to primary color grading adjustments, CapCut offers secondary color correction tools that allow you to target and modify specific colors within your video. This feature is handy when you want to make subtle adjustments to specific elements in your footage. For example, you can enhance a landscape's green tones or adjust a person's skin tones for a more flattering look.
· Film Emulation: CapCut provides various film emulation presets that mimic the characteristics of popular film stocks. By applying these presets you can recreate the look and feel of classic films, adding a nostalgic or vintage touch to your videos. Experimenting with different film emulation settings can help you achieve a unique visual style and evoke specific emotions within your audience.
· Custom Color Grading Presets: Once you've crafted a color grading look you're particularly fond of, CapCut allows you to save it as a custom preset. This feature is handy for maintaining consistency across multiple videos or projects, as you can easily apply your custom preset with just a few clicks. It also lets you share your presets, fostering community and creativity among CapCut users.
· Collaboration and Feedback: CapCut's online nature allows seamless collaboration and feedback among video editors. You can share your video projects with others, allowing them to provide suggestions and input or even directly contribute to the color grading process. This collaborative approach enhances the quality of your color grading and fosters a supportive and interactive community within the CapCut platform.
· Grain and Film Effects: CapCut can add film grain and other effects to your videos, allowing you to simulate the characteristics of different film stocks. This feature adds texture and depth to your footage, evoking a nostalgic or vintage aesthetic.
· Color Contrast and Vibrancy: CapCut's color grading tools include options for adjusting contrast and vibrancy, enabling you to fine-tune the visual impact of your videos. Increasing the contrast can make your colors pop while adjusting vibrancy enhances the saturation and intensity.
· Skin Tone Correction: CapCut recognizes the importance of accurately representing skin tones in videos. With dedicated skin tone correction tools, you can ensure skin tones appear natural and balanced, even under varying lighting conditions.

The Advantages of an Online Video Editor
One of the significant advantages of CapCut as an online video editor is its flexibility. Unlike traditional video editing software that requires installation and can be resource intensive, CapCut allows you to access its advanced color grading tools directly through your web browser. This web-based approach eliminates the need for software downloads, making it accessible on any PC or laptop with an internet connection.
Furthermore, CapCut's online platform also ensures you're always working with the latest software version. Updates and new features are implemented seamlessly without manual downloads or installations. This convenience ensures you can use the most up-to-date color grading tools and techniques, staying at the forefront of video editing trends.
CapCut's video background remover and free online video editor
In addition to its advanced color grading tools, CapCut offers a video background remover feature that further enhances your editing capabilities. This tool allows you to remove the background from your videos, allowing you to replace it with a transparent background or overlay it with a custom image or another video. The video background remover feature enables you to seamlessly integrate your videos into different settings, add creative backgrounds, or create visually engaging effects.
Furthermore, CapCut's integration with a free video editor online expands its functionality even further. This integration allows you to access various editing tools, including trimming, cropping, adding text, incorporating transitions, and more. This combination of advanced color grading tools, video background remover, and a comprehensive online video editor ensures you have all the necessary resources to create captivating videos with professional-quality visuals.

To Sum It Up
CapCut's advanced color grading tools allow users to elevate their videos' visual aesthetics significantly. With precise control over color, contrast, and tones, you can create stunning visuals that captivate your audience. Furthermore, CapCut's video background remover feature opens up even more creative possibilities. By combining these tools with your artistic vision and storytelling skills, you can unlock the true potential of your video content and leave a lasting impression on your viewers.